

How Can We Help?
Lynfa Comunicazione – Administrator Guide
Introduction:
In this article we will focus on the configuration of the “Communication” module within Polyedro and we will also investigate some generic aspects related to the management of the latter.
– NOTE –
Before proceeding, it is essential to have completed the part relating to VOIspeed, otherwise the synchronization mechanisms may not work correctly.
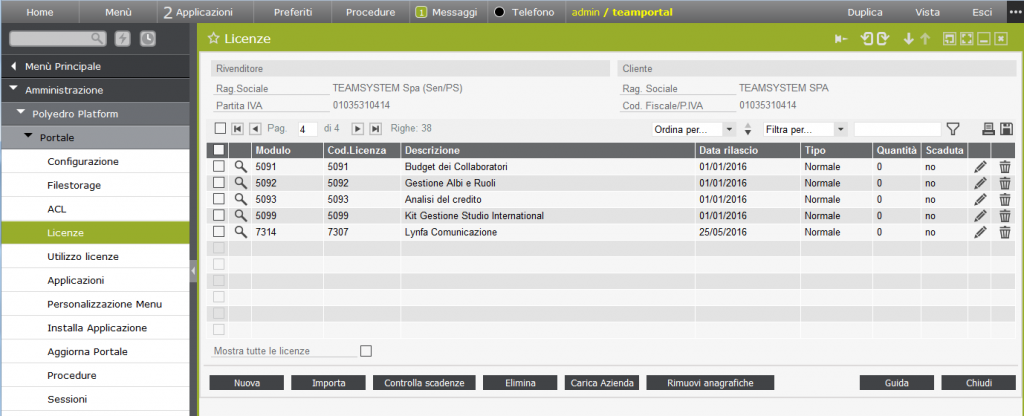
The first thing to do is to make sure you have the necessary licenses to unlock the configuration of the “Communication” module. To do this, simply (once logged into Polyedro as administrator) access the main menu (tree menu typically located vertically on the left of the page) and go to: Administration> Polyedro Platform> Portal> Licenses. In this screen you have a summary table of the licenses currently registered in the portal. Those that affect the configuration of the Communication module are those with code 7307 and 7314. In the absence of one of them, it is necessary to enter, which can be done in two ways: by clicking on the “New” button and entering the data requested in the form or by clicking on the “Import” button and uploading the specific license file.
Speaking of a new Polyedro installation, even if not strictly necessary, before moving on to the configuration of the “Communication” module, there are some activities related to the configuration of the portal that it is advisable to have already carried out. These activities are:
- Creation of the studios and companies of the portal.
- Creation of users (login).
- Creation / management of portal and corporate groups.
General configuration:
Once the checks and preliminary activities have been carried out, the actual configuration of the “Communication” module, or integration with VOIspeed UCloud, can be started. Also from the main menu it is necessary to go to Collaboration and Productivity> Communication> Administration> General configuration. The configuration is structured in several steps, the first is to specify the coordinates of the VOIspeed UCloud service in the “Server” tab. The “Communication” module is able to manage the interconnection with multiple UCloud services, this is because – being the single Polyedro server capable of managing multiple studios and / or multiple companies – there is the possibility of configuring a specific telephone service (which can be seen as a sort of virtual switchboard) for each studio and / or company.
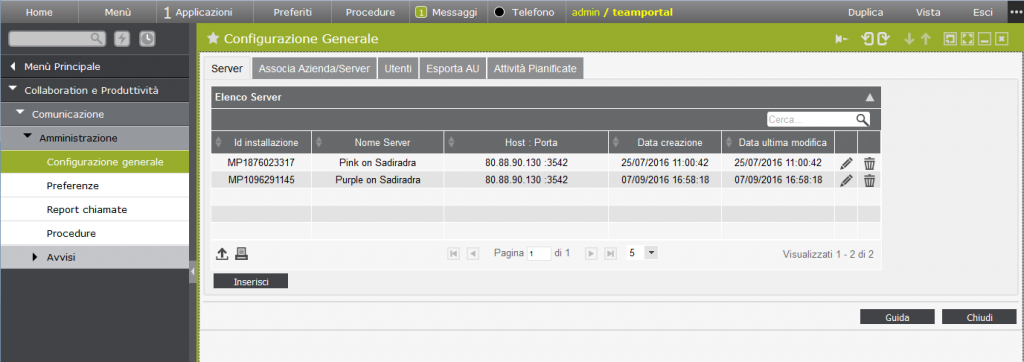
To enter the coordinates of a new UCloud service, click on the “Insert” button and enter the required data:
- Installation ID = installation ID of the UCloud company, alphanumeric code consisting of MP + 10-digit number.
- Server Name = any string that identifies the particular UCloud service.
- Host / IP address = host name or IP address of the UCloud interface to Polyedro.
- Port = port of the UCloud interface to Polyedro, generally it is fixed and equal to 3542.
- User = username of the UCloud service administrator, usually given by [installation-ID] @ [installation-domain].
- Password = encrypted password of the UCloud service administrator.
- RSA public key = upload of the RSA public key of the UCloud service which, as seen before, can be downloaded in Configuration> Company.
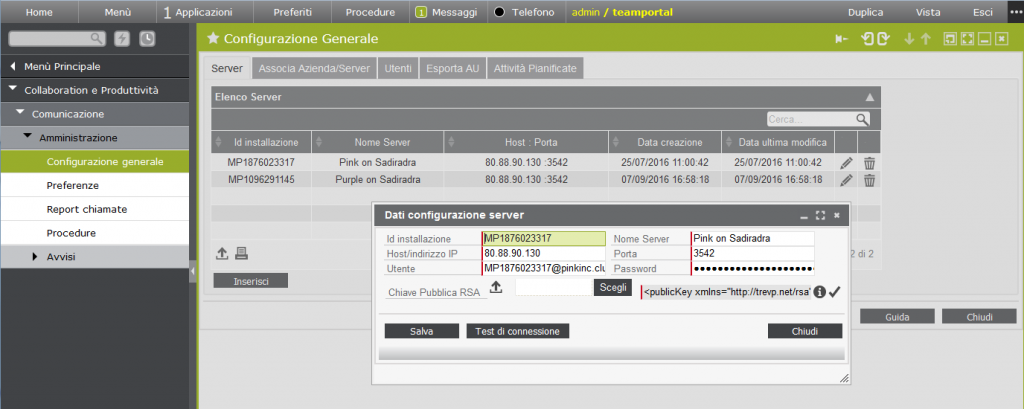
To facilitate configuration, all these parameters are summarized in a specific page of the UCloud switchboard and accessible in Configuration> Company> click on the item “Polyedro Coordinates”. For further details, refer to the VOIspeed UCloud configuration manual. Furthermore, in this form there is a button to carry out a connection test with the UCloud service to verify the correctness of the data entered, including the use of the RSA key for encryption.Una volta inserite le coordinate di un server sarà possibile in seguito modificarle o eliminarle in questa stessa schermata.
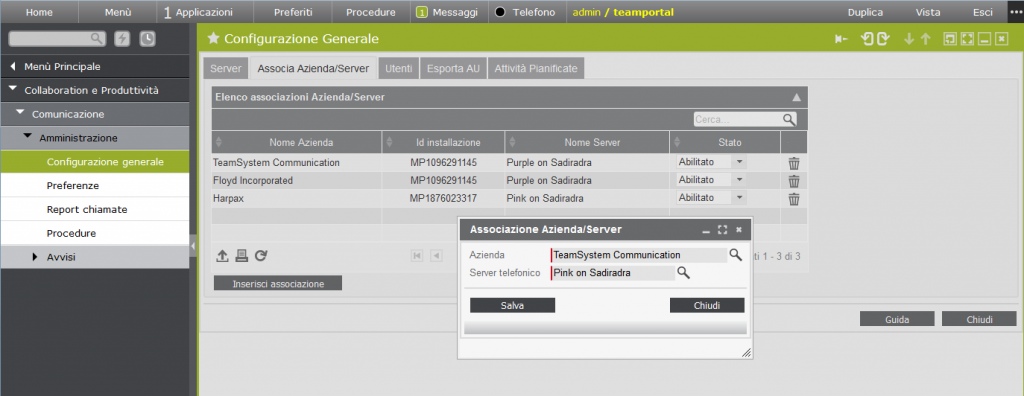
The second step is to associate each single UCloud service with a Polyedro studio or company.
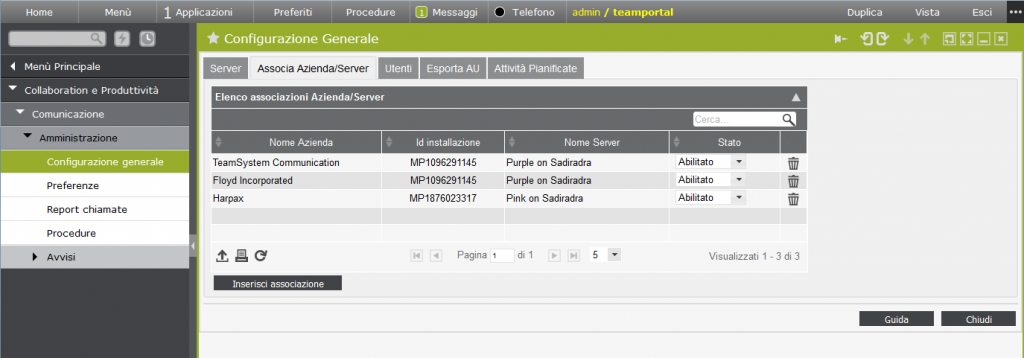
To do this, go to the “Associate Company / Server” tab and click on the “Insert Association” button and simply select – using the two lookups – one of the previously inserted UCloud servers and a studio or company present in Polyedro. The link will appear in the table and will already be enabled. It is possible to enable / disable the various connections as needed, simply by changing the status of the drop-down menu. Normally, one and only one server is associated with one and only one studio, but nothing prevents you from using the same UCloud server to serve multiple studios or companies. The other way around doesn’t make much sense.
We continue with the third and last mandatory step to complete the configuration of the “Communication” module, that is the selection of the portal users to whom you want to provide the telephone functions (telephone interface, chat, integration with management systems, call reporting, etc.). This activity takes place in the “Users” tab and must be done for each studio or company, previously associated with a VOIspeed UCloud service. Then you first select the company in the table above, then check the users you want to enable, and finally click on the “Save” button.
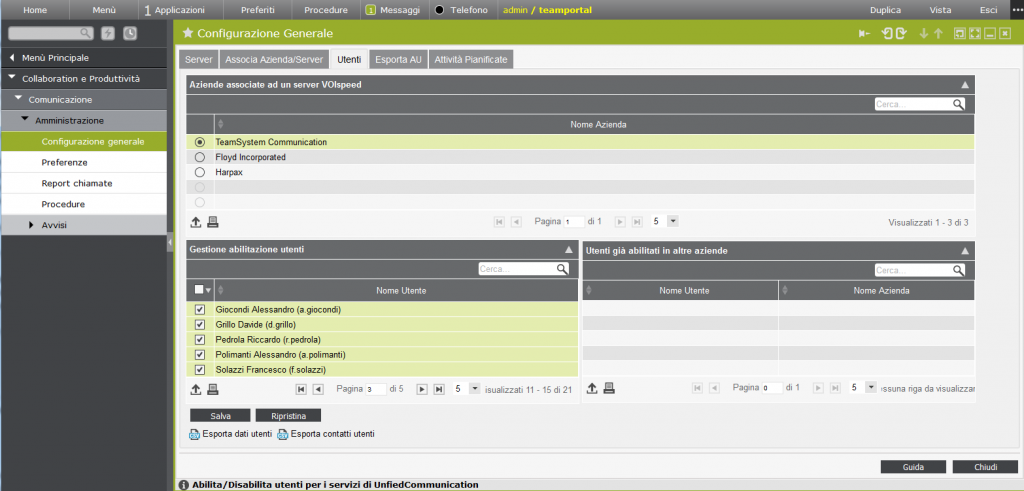
It is important to emphasize that the user is enabled not as such, simply on the basis of login, but by virtue of belonging to a certain studio or company. This means that if a user belongs to several studios or companies, he may or may not use the Communication services, based on the company selected during the portal access phase.
It must be explicitly said that the configuration of the users in the “Communication” application alone may not be sufficient to guarantee the presence of the telephone interface once the user has logged in. In fact, in Polyedro, access to applications is regulated by an ACL system, which is a standard feature of the portal. Let’s briefly see how to set the ACLA permissions for the “Communication” application without deepening the subject too much (which would require a fairly complex separate discussion), but limiting ourselves to giving indications for a typical configuration, which may be fitting in the majority use cases.
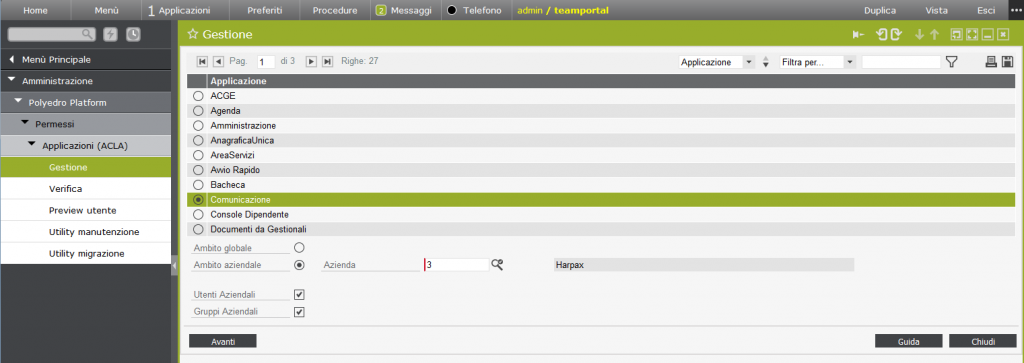
It will then be necessary to go to the ACLA management page of the portal: Main Menu> Administration> Polyedro Platform> Permissions> Applications (ACLA)> Management. At this point in the table above you must select the “Communication” application, choose to manage permissions in “Business scope” and in the lookup alongside, select the company to which the users for whom we are going to set the permissions belong . It is also possible to assign permissions in a global context, based on the roles and groups of the portal, but typically it is convenient to think by company.
By clicking on the “Next” button you access the next screen, in which you have to select the users and you can choose to do it in two ways:
- for company groups: you select a company group and the permissions will apply to all users belonging to the group
- for business users: you select the business users one by one
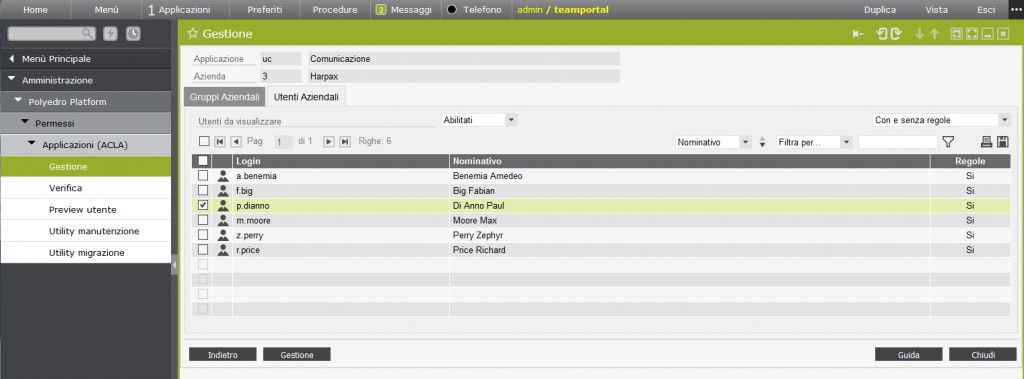
Once this choice has also been made, click on the “Management” button and access the third and last screen, in which to select the actual permissions on the basis of the application menu displayed by the “Communication” module. As regards the typical user, the permissions should be set as shown in the figure, that is, they should be given to the “Management” menu and to the non-menu functions “Call Settings” and “Telephone”, which allow the telephone interface to be integrated directly into the Polyedro container. Once the permissions have been checked, press the “Confirm” button.
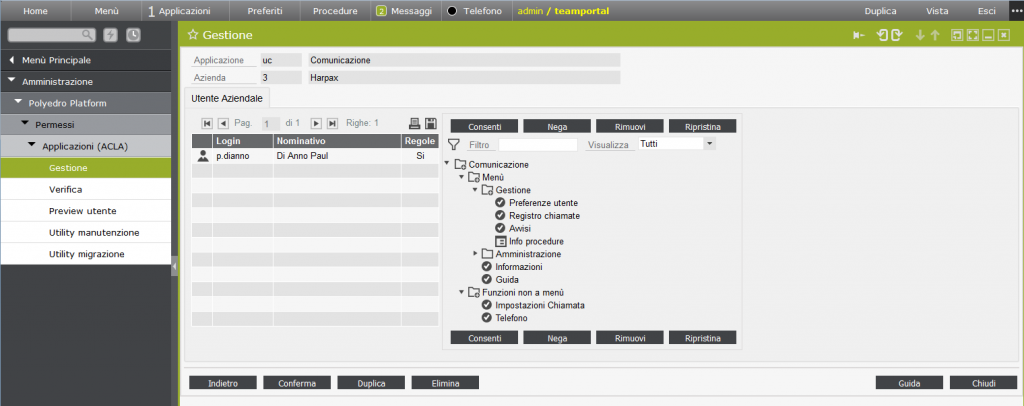
Furthermore, since the telephone interface integrated in the Polyedro Container uses the address book of the portal itself (which presents a mix of its private and shared contacts, and the entries of the Single Registry), to provide the user with this functionality too, it is necessary to give the user permissions on the “Address books and Contacts” application. To do this, while remaining on the ACLA management page, you must return to the home screen (by clicking on the “Back” button). Here you will need to deselect the “Communication” application and select “Directories and Contacts”.

At this point you return to the third screen and give the user the permissions on the application as shown in the figure.

In this brief excursus on the ACLA Polyedro for a correct functioning of the “Communication” module, as mentioned, we have assigned some sets of typical permissions that embrace all the foreseen functions. Clearly this is not a general rule: each portal administrator can decide at his own discretion to assign more or less stringent permissions, decided on the basis of the needs of the scenario in which the customer operates. If you want to have an exhaustive knowledge of the portal permissions management, we invite you to consult the Polyedro manual, relating to the configuration of application permissions: ACLA.
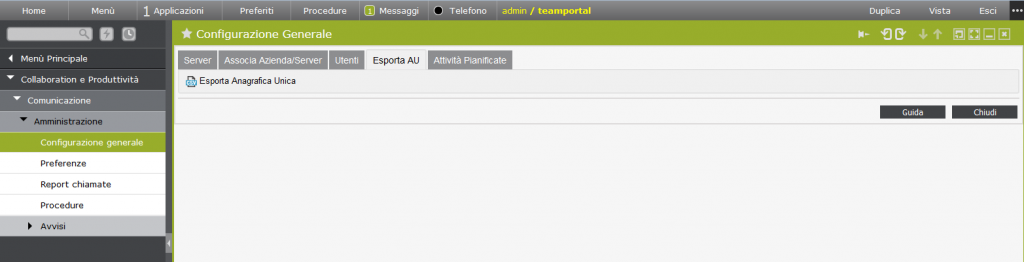
From this moment on, a series of synchronization mechanisms are established which ensure that both the users and the contacts in the personal address books (Address Book & Contacts application), and the elements of the Single Registry (General Registry) are automatically aligned with the UCloud service. These mechanisms, however, require or do not require additional manual activities depending on the starting situation, ie in the presence of a virgin installation of both Polyedro and VOIspeed, or a pre-existing and active Polyedro installation. In the second case, since the VOIspeed UCloud service is not yet synchronized with the existing contacts and personal data, it will be necessary to carry out an export and subsequent manual import. First of all, in the “Users” tab, the personal contacts of the enabled users must be exported, by clicking on the “Export user contacts” link and subsequently imported through the UCloud service management web interface, in Configuration> Toolbox> Address book> click on the “Import address book” icon. Secondly, it is necessary to move to the “Export AU” tab and export all the Single Master Data by clicking on the appropriate link. Therefore, as before, the file generated by Polyedro must be imported into the VOIspeed address book. For more information on importing the address book into the VOIspeed switchboard, please consult the online guide of the Ucloud service.
Attention! The initial manual synchronization of user contacts must be done for each company to which a UCloud service is associated, so for example, if you have a situation such as: COMPANY 1 associated with PBX 1 and COMPANY 2 associated with PBX 2, they must be exported the contacts of company 1 and imported into the PBX 1 server, then the contacts of company 2 must be exported and imported into the PBX 2 server. PBX 1 and PBX 2.
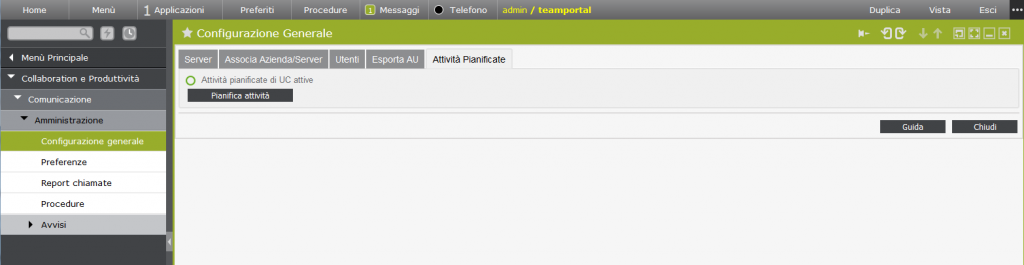
Finally, the last tab of the general configuration “Scheduled Activities” is simply a monitoring section, which allows you to check that the planned activities at the portal level necessary for the proper functioning of the “Communication” module are active. Otherwise, by clicking on the “Schedule activities” button, you can manually reset these activities.
Preferences
The preferences page allows you to set the parameters that regulate both the integration with the information and alerts window during the call, and the options relating to the call itself.
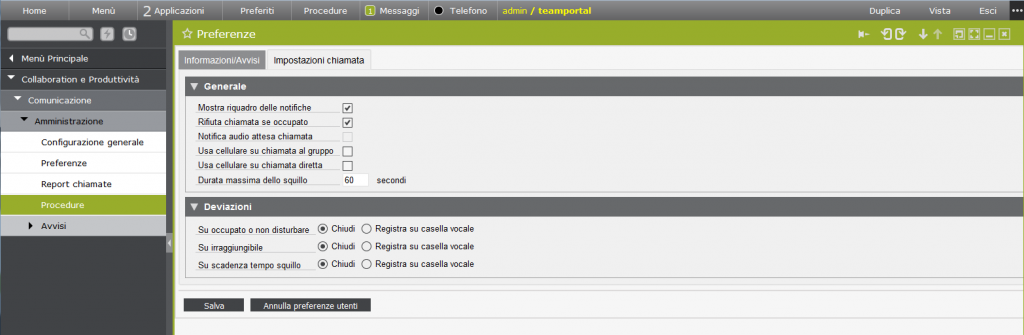
The preferences concerning the call allow you to decide how to best manage all incoming and outgoing call situations based on the specific needs of the user. They typically concern the VOIspeed world, therefore for an in-depth study on this topic we invite you to consult the VOIspeed UCloud guide.
Instead, in the first tab “Information / Notices” you can decide which telephone events to trigger the opening of the screen in which the user can view any warnings or information from the management systems associated with the registry.
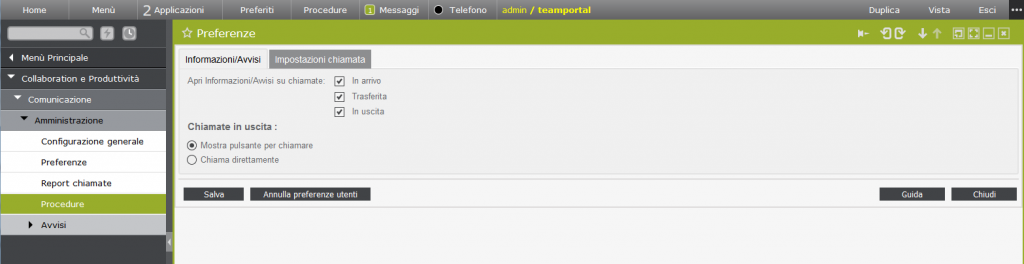
Obviously, this functionality is only implemented when the VOIspeed UCloud service finds a correspondence between the telephone number and a personal data element (Single Registry). With regard to outgoing calls, you can decide on a further behavior of the application, i.e. if you want the call to always be made and the information screen to be opened at the same time, or if you want to view the information screen first, leaving the call on standby, and only later, after reading the information, do you want to confirm the outgoing call. Also in this case the passage to the information screen takes place where there is a correspondence between the telephone number and the personal data. The parameters that are set from the administrative menu represent the default values assigned to all users who have the “Communication” module; subsequently each user can change these settings, as long as they have the relevant ACLA permissions, granted by an administrator. If the administrator decides at a later stage to deny the user the ability to set their preferences, they can use the “Cancel user preferences” button to delete any special settings made by users.
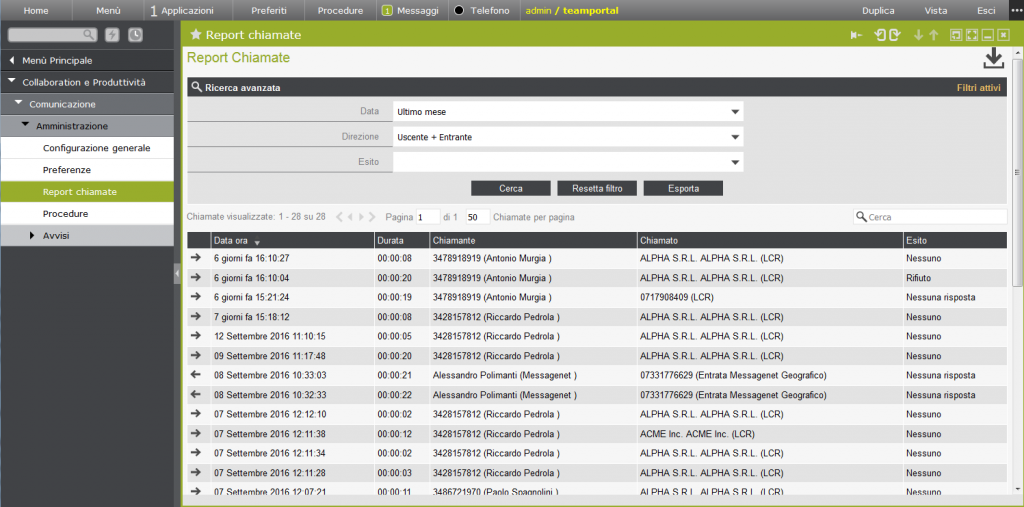
Call reports
The “Call report” item in the Administration menu allows you to view the complete report of the calls relating to a switchboard of a specific office or company. In fact, when you enter this screen, a company selection lookup is immediately proposed, then clicking on the “View report” button brings up a screen in which you can view, filter and export the list of all calls in a certain interval of time. The displayed page is downloaded directly from the UCloud service and encapsulated in a Polyedro WorkArea. It is therefore not a Polyedro application but a VOIspeed interface, which still offers the same look & feel of Polyedro. For a detailed guide to the call report, refer to the VOIspeed UCloud manual
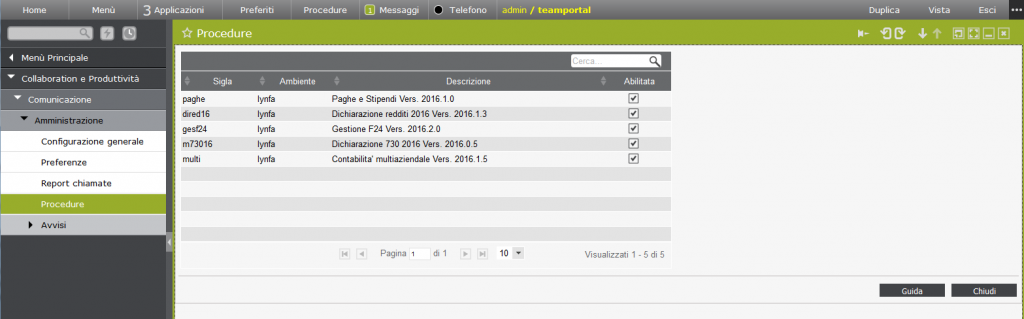
Procedures
In this page of the configuration of the “Communication” module, the management procedures are selected (to date those of the Lynfa world) that you want to query in order to retrieve information relating to a personal data, contextually to the call. Information that is then displayed to the user on the screen that is opened during an incoming, outgoing call, etc. compatibly with what is set in the preferences (see paragraph “Preferences”).
Notices & Permits
The “Communication” module also provides a complete management section of the notices that can be associated with a personal data and subsequently viewed during the call phase. In the administrative part, on the Alerts management page you have a list of all alerts for all personal data (but it is not possible to insert new ones, functionality reserved for non-administrative users).
In the header there is the selection of the work company and the registry with which to filter the alerts. In addition to the filter on the personal data, the fields with all the information already present for that personal data will be filled in in the Contact details section. There is an additional section Filters “through which you can select various parameters to limit the search field of alerts.
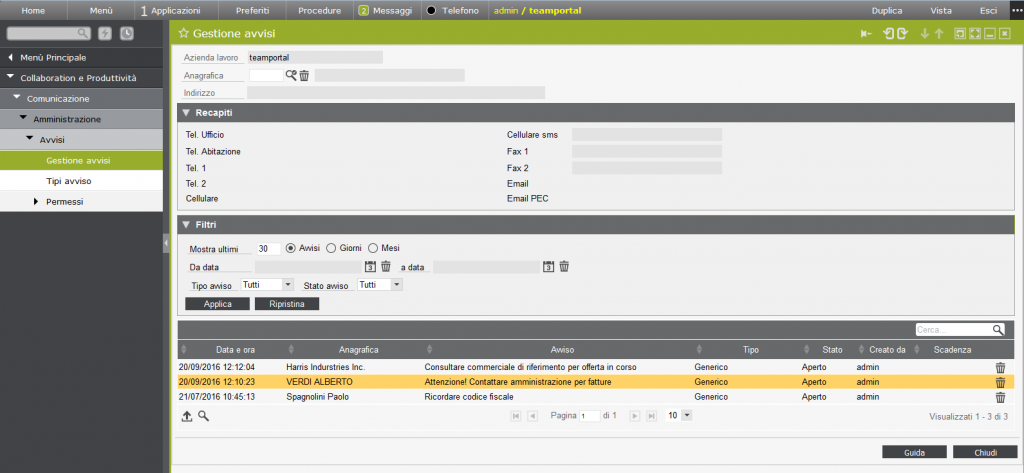
Furthermore, the management of alerts is not limited only to this page, but through the other menu items it is possible to access management of both the typing of alerts and the permissions on them. Viewing permissions can be assigned both by single notice and by type. For further information on the subject of notices, please refer to the contextual guide in Polyedro.