Manuali VOIspeed®
V6 UCloud auto responder (IVR) integration
In this article we will see the possibilities made available by the PBX VOIspeed UCloud to manage integrations on the automatic responder (IVR) side.
This type of integration makes it possible to make the behavior of the automatic responder of your switchboard dynamic based on various parameters (); obviously, given its potential, the responder can also be implemented if it is not strictly necessary to allow the switchboard to have customized behaviors for incoming calls.
More generally, through the integration on the IVR side of the VOIspeed UCloud it is possible:
- Validate user input for access to dedicated or protected services;
- Transfer the call to different entities based on user input;
- Capture user input to update external DBs;
- Dynamically update the operating data of a node to fully characterize the routing of calls.
CONFIGURE THE INTEGRATION IN THE RESPONDERS IN THE UCLOUD PLATFORM
To activate the integration with external scripts in a responder node, you need to enable the Execute external script action and indicate the URL of the script in the field below:
The script is executed at the end of the node message, if present, or upon typing the required user input. The execution of the script involves sending an HTTP GET to the URL indicated in the configuration, to which the following parameters are added:
- companyid (company identification)
- ivrid (ID of the responder being browsed
- nodeid (ID of the node from which we launched the script)
- callid (call ID -> the same as we find in call monitoring)
- calling (calling number)
- called (called number, by virtue of which, through a routing rule, the responder in question was selected
- tag (tag associated with the node; if it is not specified from the outside with command 5, it is always zero)
- input (dtmf sequence typed by the user compliant with what is preconfigured in the node)
The script must return a sequence of textual parameters (without HTML code), each of which is separated from the others by a carriage return (Ex. In PHP echo “\ r \ n”):
- Each parameter must respect the syntax NAME_PARAMETER = VALUE_PARAMETER
- The first parameter must always be the command, in the absence of the command the call is cut down; the command syntax is COMMAND = COMMAND_TYPE where COMMAND_TYPE can have one of the following values:
- 0 → End call; this command breaks down the call and does not require any additional parameters;
- 1 → Transit to child node; this command will make the call pass through a child node with respect to the one where it is located, identified by the NODE_KEY = key_value parameter. If no child node exists with this key, the call will be dropped;
- 2 → Transfer call to number; this command triggers the search and transfer of the destination entity, the search is performed starting from the RECIPIENT_NUMBER = value parameter;
- 3 → Transfer call to entity; this command will transfer the call to the entity identified by the parameters:
- RECIPIENT_TYPE = type; type of destination entity. Type can assume the following values, each linked to a table of the reference DB (shown in brackets);
- 0 = User;
- 1 = Group;
- 2 = Gateway;
- 3 = Responder;
- 7 = Terminal;
- 8 = Company voicemail, in this case the voicemail and message recording function will be activated;
- 10 = Meeting room;
- 11 = Parking line.
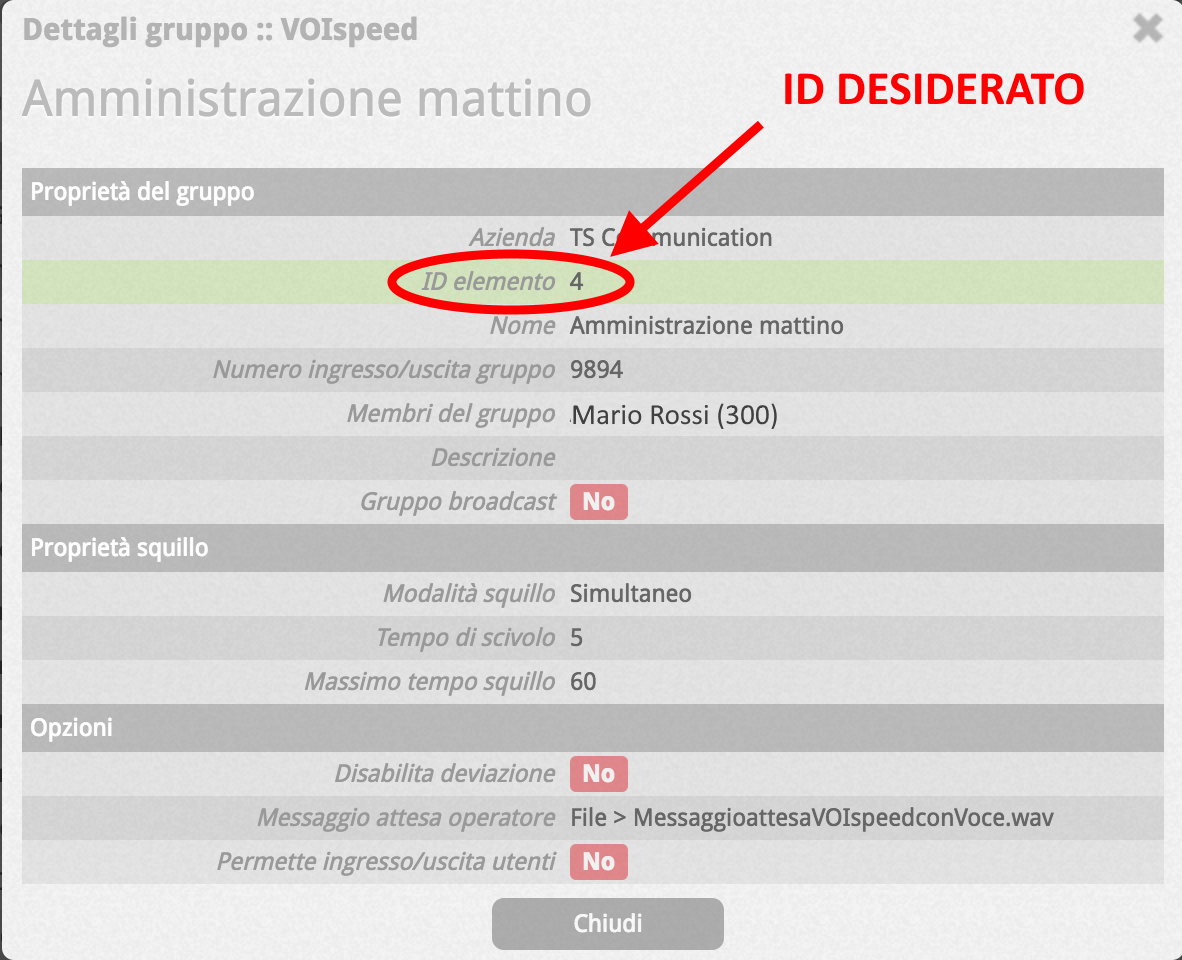
- RECIPIENT_ID = identification id of the destination entity. The parameter will depend on the RECIPIENT_TYPE and, based on it, it will be possible to find it in the details of the entity itself: for example, assuming you want to end the call on a specific group, the pair of parameters will be given by:
- RECIPIENT_TYPE = 1 (as per the previous point);
- RECIPIENT_ID = the value I find by clicking on the “magnifying glass” symbol for the desired group from the Configuration -> Groups section, as shown in the figure below:


- RECIPIENT_NUMBER = value_number; where value_number will be entered in the call parameters to the target entity and represents the number by which the chosen entity is called. Eg:
- Suppose we receive a call on our geographical number 02XXXXXXX from the number 392XXXXXXX. Having to forward the call to an extension and wanting it to see the call arrive from the original calling number, the parameter must be set to the value 392XXXXXXX.
- Suppose we receive a call on our geographical number 02XXXXXXX and want to forward it to a number outside the switchboard using a given gateway. In this case, the parameter must take the number to which the forwarding is to be made as its value while RECIPIENT_TYPE will be 2 (to select the “gateway” entity) and RECIPIENT_ID will be the gateway ID you want to use to make the external call.
- RECIPIENT_TYPE = type; type of destination entity. Type can assume the following values, each linked to a table of the reference DB (shown in brackets);


