

Manuali VOIspeed®
VOIspeed V-6016v2 – FXS adapter
BEFORE PROCEEDING! If the LAN network is configured in the 192.168.1.XX subnet, it is necessary to proceed with the configuration via a PC connected DIRECTLY to the adapter’s PC port (just use a straight network cable). Otherwise go directly to point 4)
- Make sure the PC has an address in the 192.168.1.XX subnet other than 192.168.1.1
- Turn on the adapter with the supplied power supply, open a browser and type the address 192.168.1.1 (password: admin)
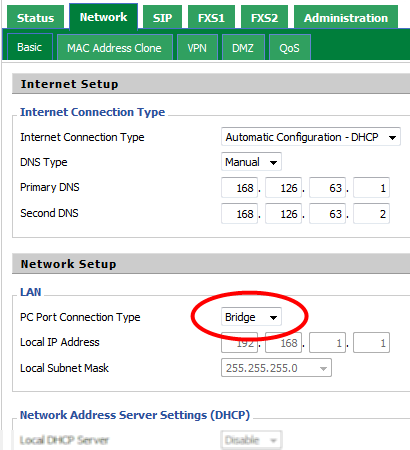
- Enter the Network – Basic section and set the Port Connection type parameter to Bridge; save, restart and go to the next step
- Turn on the adapter by connecting the supplied power supply to the mains and the plug to the appropriate port.
- Connect the adapter to the data network using the LAN port: if the network is equipped with a DHCP server, the adapter will automatically acquire a valid IP address.
- To check the address obtained, simply connect an analog telephone to one of the two FXS ports, lift the handset and type the command ****, wait for the recorded voice to start listing the possible options, then press the 2 key. entry will indicate in English, digit by digit, the IP address obtained.
If there are any problems or you do not have a DHCP server, the entry will show 0.0.0.0 and you will need to set one manually.
MANUALLY CONFIGURE THE STATIC IP ADDRESS
- Connect an analog telephone to an FXS port.
- Lift the handset and enter the **** code to enter the telephone management of the adapter
- Enter the code 1 followed by 23646 # and finally 2 # to set the static IP mode
- Type 2 to listen to the adapter IP. As soon as the entry ends, enter the new IP you want to assign (use * instead of the dot to separate the digits of the values) followed by the # key to apply the change.
- After entering the static IP (and after listening to the voice confirming the change), restart the adapter with the new settings by invoking command 7.
For example, if you want to assign the address 192.168.0.123, the complete command at point 4 will be 2192 * 168 * 0 * 123 #.
The VOIspeed V-6016 analog adapter can be used to convert up to two traditional analog devices (telephones, cordless phones, etc …) into SIP terminals that can be registered as users in the switchboard. These will be connected to the two FXS ports (indicated as FXS1 and FXS2) and configured appropriately. In addition, the adapter will give new features to the analog phone such as waiting, call transfer, etc.
Analog peripherals with advanced functions (such as transfer, forwarding, etc.) linked to old analog switchboards will not be able to maintain these functions unchanged. However, these operations will be possible thanks to the adapter by following the appropriate procedures and configurations.
FUNCTIONALITY
The VOIspeed V-6016 analog adapter can be used to convert up to two traditional analog devices (telephones, cordless phones, etc …) into SIP terminals that can be registered as users in the switchboard. These will be connected to the two FXS ports (indicated as FXS1 and FXS2) and configured appropriately. In addition, the adapter will give new features to the analog phone such as waiting, call transfer, etc.
Analog peripherals with advanced functions (such as transfer, forwarding, etc.) linked to old analog switchboards will not be able to maintain these functions unchanged. However, these operations will be possible thanks to the adapter by following the appropriate procedures and configurations.
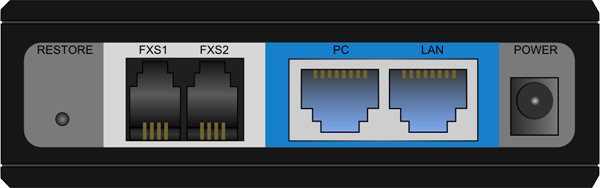
| Description Rear panel |
|
| Restore | Allows you to reset the adapter to factory settings |
| FXS1 FXS2 |
The analog devices to be converted into SIP terminals (traditional telephones, cordless, …) must be connected to this port. |
| PC | Repeats the data network present on the LAN port. This port can also be used to cascade multiple adapters |
| LAN | Port for connecting to the data network. The adapter will use this port for all connections to / from the switchboard and for the update procedure |
| Power | Power Connector for the power supply. We remind you that it is forbidden to connect a power supply other than the one supplied with the adapter. The correct power supply is the one contained in the package: 5V 2a |
| Meaning of the LEDs |
|
| Power | Power The adapter is on |
| LAN | The adapter is properly connected to the network |
| PC | PC port in use |
| FXS1 FXS2 |
Lights up when it detects the phone and blinks when it is in use |
The V-6016v2 provides for the cascade connection of multiple adapters both horizontally and vertically using the supplied supports for mutual fixing and PC ports for data network replication.
Do not connect the switchboard to the PC network port. The adapter uses only the LAN port to communicate with the switchboard. Similarly, if you try to update the adapter firmware, do not connect the TFTP server to the PC port.
CONFIGURE THE ADAPTER
Turn on the adapter by connecting the supplied power supply to the mains and the plug to the appropriate port. Then connect the adapter to the data network using the LAN port. If the network is equipped with a DHCP server, the adapter will automatically acquire a valid IP address.
To check the address obtained, simply connect an analog telephone to one of the two FXS ports, lift the handset and type the command ****, wait for the recorded voice to start listing the possible options, then press the 2 key. entry will indicate in English, digit by digit, the IP address obtained.
If there are problems or you do not have a DHCP server, the entry will indicate 0.0.0.0 as the IP address and you will need to set one manually.
MANUALLY CONFIGURE THE STATIC IP ADDRESS
- Connect an analog telephone to an FXS port.
- Lift the handset and enter the **** code to enter the telephone management of the adapter
- Enter the code 1 followed by 23646 # and finally 2 # to set the static IP mode
- Type 2 to listen to the adapter IP. As soon as the item ends, enter the IP you want to assign to the adapter (use * instead of the dot to separate the digits of the values) followed by the # key to apply the change.
- After entering the static IP (and after listening to the voice confirming the change), restart the adapter with the new settings by invoking command 7.
For example, if you want to assign the IP address 192.168.0.123, the complete command in point 4 will be 2192 * 168 * 0 * 123 #.
ACCESS TO THE WEB INTERFACE
To access the WEB configuration interface, you need to open a web browser and write the IP address of the adapter. The login page will open where you can enter the password for authentication.
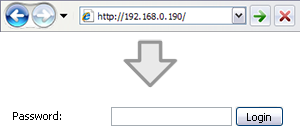
Default value for authentication: admin
At the top of the configuration web interface there is a menu to navigate in the various sections.
- Status: current status of the adapter;
- Network: LAN network interface settings;
- SIP: general settings of the SIP protocol;
- FXS1: settings of the line corresponding to the FXS1 port;
- FXS2: line settings corresponding to the FXS2 port;
- Administration: settings related to the general administration of the adapter.
REGISTER AN FXS LINE AT THE SWITCHBOARD
First of all, a user must be created in the switchboard to be associated with the FXS line being configured. Eventually, you could use the FXS line you are configuring to add a telephone device to a user, making it possible to use two devices at the same time (Tandem). In this case, the access credentials are the same as the tandem user. See New User Creation for more information.
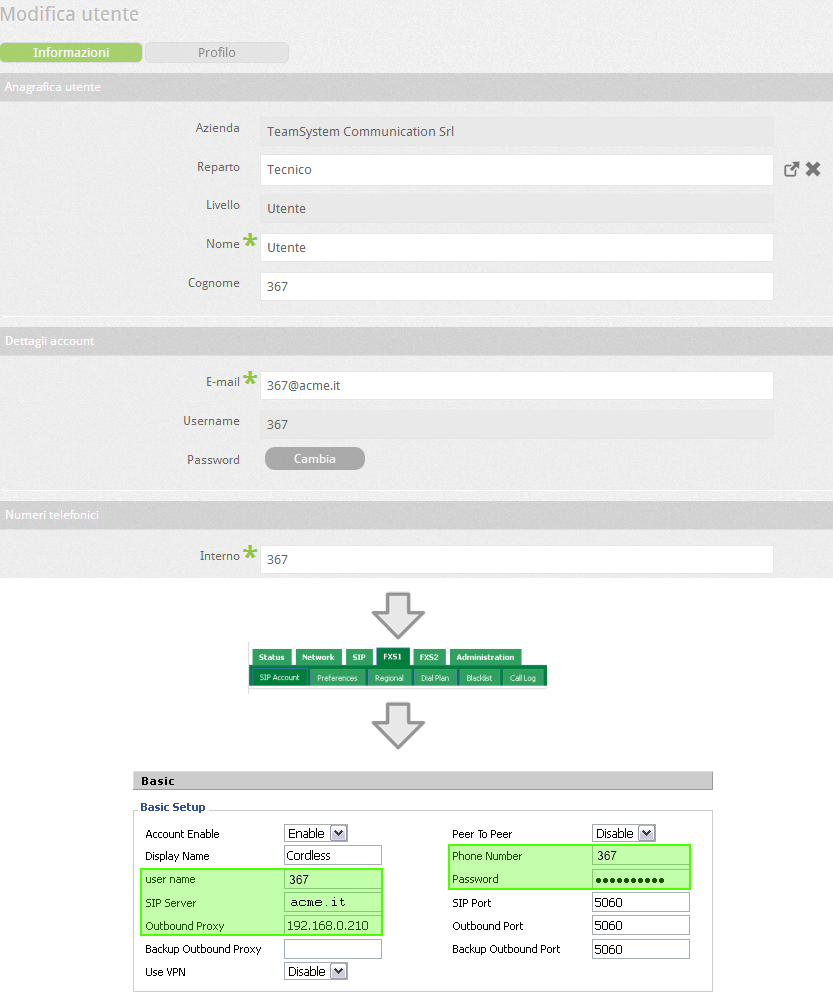
Once the user in the switchboard is created, access the V-6016v2 configuration WEB interface, select FXS1 (if you want to configure the FXS1 line) or FXS2 (if you want to configure the FXS2 line) and fill in the various fields with the values indicated in the switchboard.
| SIP parameters |
|
| User name | User name User username: not to be confused with the extension if different |
| SIP Server | SIP Server Corporate domain (configured in the PBX) |
| Outbound Proxy | IP address of the switchboard |
| Phone Number | Number The user’s extension number |
| Password | User password |
| Other | Leave the other parameters as default |
SET THE VOLUMES OF THE DEVICES
Access the V-6016v2 configuration WEB interface, select FXS1 (if you want to configure the FXS1 line) or FXS2 (if you want to configure the FXS2 line) and enter the Preferences subsection. In the Audio part, you can set the volumes of the microphone (Input Gaing) and of the speaker (Output Gain). By default these values are both set to 6. Adjust these volumes as needed.
![]()
Do not set these values to 0 otherwise there will be no passage of audio.
BASIC TELEPHONE OPERATIONS
To initiate a call, simply pick up the handset and, as soon as you hear the continuous tone, enter the number you want to call. Obviously it is also necessary to take into account the method of detection of the end of the number selected during the Call Settings (in the FXS -> Preferences section). By default, Call Immediately Key “#” and Time out at 3 sec are selected, so you just have to end the number you want to call with the hash key (#) or simply wait 3 sec. to start the call.
To put the interlocutor on hold, simply type the R key on the phone. To resume it, you have to re-type R.
You can also transfer the supervised call to another number. First of all, put the user on hold and, while you hear the continuous tone, start the call to another number. If the tone becomes intermittent, the second call can no longer be initiated and you can only resume the held call with the R key.When the second party answers, you can press the R key to switch between the two calls, or hang up the handset to transfer between the two calls.
The procedure for performing the blind transfer (ie without supervision) is completely different from the previous one: type the key sequence * 98 to put the first call on hold and prepare the system for blind forwarding. Once you have finished typing the string * 98, you will hear the fixed tone during which it will be possible to type the extension to which the call is to be forwarded, followed by the # key. To conclude the blind forwarding, it is necessary to lower the handset.
CONNECT ANALOG FAX TO THE FXS LINE
Connecting an analog FAX to a SIP adapter inevitably involves inconvenience. In fact, the technology with which the device sends the fax is absolutely not compatible with that used by the adapter to send the audio and therefore it will never work perfectly. Once you take this risk, you can proceed by trying to find the configuration that minimizes the inconvenience.
The first step is to have the line registered as an extension of the switchboard following the instructions provided above. Then go to the FXS -> SIP Account -> Codec Setup section and set the Eco Eraser to Disabled (as shown in the figure below).
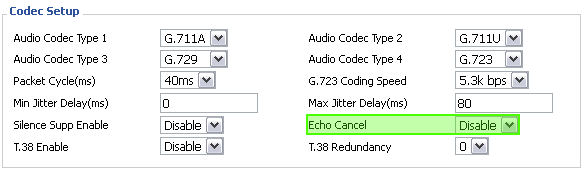
As mentioned at the beginning of the section, this procedure is used to identify the configuration that minimizes inconvenience.
What has been said for the fax can also be used if you want to connect a POS device (for cards and ATMs) or an analog modem to the FXS line.
It is not possible to guarantee that the adapter will work with all analog devices on the market, i.e. there may be analog fax or POS models or modems that do not work at all when connected to the FXS line of the adapter, even if you have followed the procedure just indicated. For more information, contact Technical Support by phone.