

How Can We Help?
Yealink T46G IP Phone Configuration
It is advisable to configure the Yealink T46G IP Phone always using the self-provisioning function because it is faster and absolutely error-free.
Yealink T46G IP Phone Configuration
The Yealink T46G IP phone with default settings automatically searches for a DHCP server on the network during boot to obtain a valid IP address. For the use of phones with the VOIspeed Server, the Firmware version 28.72.0.25 is recommended.
PHONE CONFIGURATION
Configuration is done via the web, by connecting with a browser to the phone’s IP address. Obtain the phone’s IP from the DHCP server monitoring or directly from the phone, by pressing the Menu softkey (bottom right below the display) and accessing the Status section.
Once connected via the web, the administrator’s username and default password are both set to “admin”. Below we indicate the parameters to be modified with respect to the default configuration, referring to a generic VOIspeed PBX user with the following example credentials:
username: 399
password: 3434343xyz!
internal: 399
VOIspeed server ip address: 192.168.0.220
VOIspeed server domain: your_domain.com
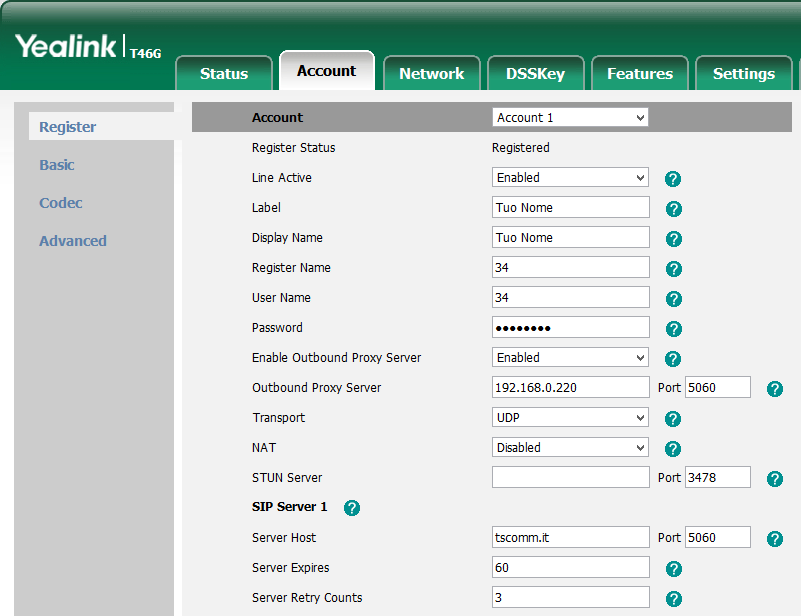
ACCOUNT -> REGISTER
We list below the parameters to be modified
| Line Active: Enabled Label: Your Name (indifferent for registration purposes) Display Name: Your Name (indifferent for registration purposes) Register Name: username of the user on the VOIspeed PBX (ex: 399) User Name: user’s extension on the VOIspeed PBX (eg. 399) Password: user password on the VOIspeed PBX (eg. 3434343xyz!) Enable Outboud Proxy Server: Enabled Outbound Proxy Server: IP address of the VOIspeed PBX (ex: 192.168.0.220) Port: is the SIP listening port of the PBX. Indicate: – 5060 for the On Premises platform – 5058 for the Cloud platform – XXXX for the UCloud T46G account platform |
 |
NOTE: The SIP listening port in UCloud environment for SIP terminals is different for each company. Therefore the fields in question will be according to the cases, therefore it is necessary to consult in the settings of the PBX which is your port. Connect to the Configuration → Company menu and see the value of the SIP Port parameter in the Properties box.

SIP Server 1
Server Host: Server Host: domain of the VOIspeed PBX (e.g. my_domain.com)1
Port: 5060
Server Expires: recommended value between 60 and 120 (in seconds)
1Attention: the domain name must be entered in the xxxxxxxx.yyyy format (eg: miazienda.pbx, company.biz, società.it, etc.).
For VOIspeed 4, enter the IP address of the VOIspeed server.
After completing the entry of the above parameters, you need to click on the Confirm button. If the registration was successful, you will see Registered at the top.
ACCOUNT -> CODEC
| In this section it is important to ensure that at least the PCMA codec (G.711) is present. For the rest, it is good to organize the list of codecs in decreasing quality and, therefore, increasing in terms of bandwidth usage optimization. |
 |
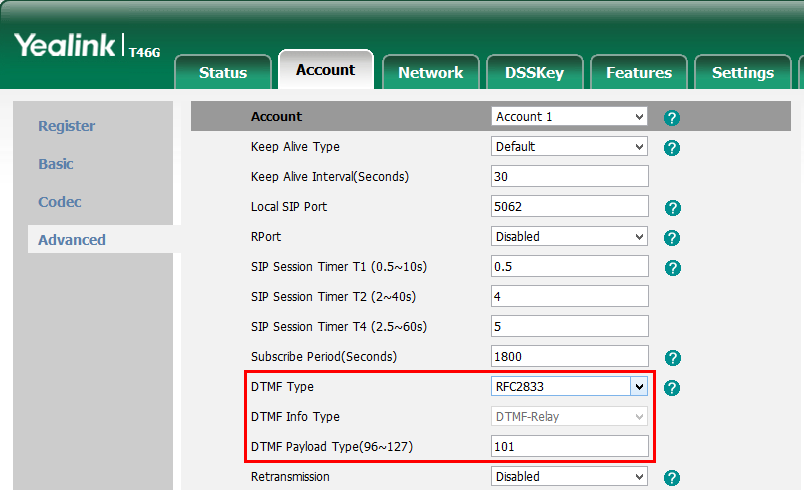
ACCOUNT -> ADVANCED
| In this section you can configure how the phone sends DTMF tones. Use the following settings: DTMF Type: RFC2833 DTMF Payload Type: 101 |
 |
FEATURES -> TRANSFER
In this section it is possible to configure the behavior of the telephone when the SW Transfer key is pressed during a call in mode by modifying its default value.
|
 |
SETTINGS -> TIME&DATE
To automatically set the phone time, set the following parameters:
Time Zone: +1 Italy(Rome)
Primary / Secondary server: enter a URL for the desired NTP run servdert nearby (ex: it.pool.ntp.org oeurope.pool.ntp.org)
Syncronism: indicates how many seconds the phone updates its time: A high value is recommended (eg 1 day = 86400)
Date / Time Format: set the date / time format desired by the user
CLICK TO DIAL
The phone natively supports click to dial, i.e. the ability to make calls sent from the users GUI. However, the function must be activated in the terminal configuration of the PBX. In the Toolbox – Terminals section, locate the user agent Yealink SIP-T46G 28.72.0.25 (you can also search for the string “yealink” in the “search” field to locate the terminal). If the user agent is not present it will be necessary to register the first telephone. After identifying the user agent of the phone, enter into edit and enable the “click to dial supported” function.

CONFIGURATION OF BLF KEYS
The Yealink T46G phone has 12 line keys, one of which is used for the voispeed user account. The remaining 11 keys can be used to view the status of the switchboard extensions and to make calls quickly. To configure a BLF key go to the DSSKey menu.

Do not modify the first row of the table (Line Key1) because it represents the line connected to the switchboard. Then start from the second line (Like Key2) and set:
Label Lenght: Extended (allows you to have the graphic keys with the longest description)
Type: BLF
Value: internal of the desired user
Label: Convenience name of the contact
Extension: leave the field blank
The LED associated with the button will indicate the status of the extension (the graphic part is always fixed) in this mode:
off: user free or off
flashing red: user is ringing
steady red: user busy
AUTOMATIC USER IMPORT WITH CUSTOM RING
Warning: this procedure, if intended to differentiate the internal ring tones, can be avoided in the new version 6.5.X for PBX, since now it is the switchboard that sends the type of call (internal / external) to the terminals, using the SIP alert method. info. For information see the KB article.
It is possible to import the switchboard extensions into the local phone book and specify a desired ringtone for them so that external calls can be distinguished from internal ones. Follow the steps below:
- Enter the WEB administration of the phone
- Go to the Directory / Local directory section
- Click on the Import Csv button as in the image below:

- Import the appropriately modified file according to the template available here, customizing the display_name, office_number, ring and group_id_name fields