

Manuali VOIspeed®
Mediatrix FXS C7 Series for analog telephones
The C7 series Mediatrix devices are SIP adapters to FXS interfaces for the integration of 4 or 8 analog telephones, depending on the model, with the VOIspeed switchboard. The following guide is valid for both the 4-door model and the FXS 8-door model.
PREMISE
The devices are configurable through a web browser; they are equipped with two Ethernet ports: the ETH1 port is configured to obtain an IP address from a DHCP server active on the local network, while the ETH2 port is set to the static IP 192.168.0.10. We suggest configuring devices with dynamic IP reserving an entire range for all terminals. The presence of a DHCP server on the network is therefore recommended.
NOTE: in the following, the ETH1 port with dynamic IP will be used, as it saves a few programming steps. For more details see the complete manual downloadable from the link at the bottom of the page.
ACCESS TO CONFIGURATION
Turn on the device and connect a LAN cable to the ETH1 port, wait a few seconds until the Read LED becomes fixed. With a network scanner (eg. Netscan) locate the device (MAC address of the vendor: 00: 90: F8); open a browser and type the IP address found. Enter the username “public” without password to access the configuration.
NETWORK PARAMETERS CONFIGURATION
|
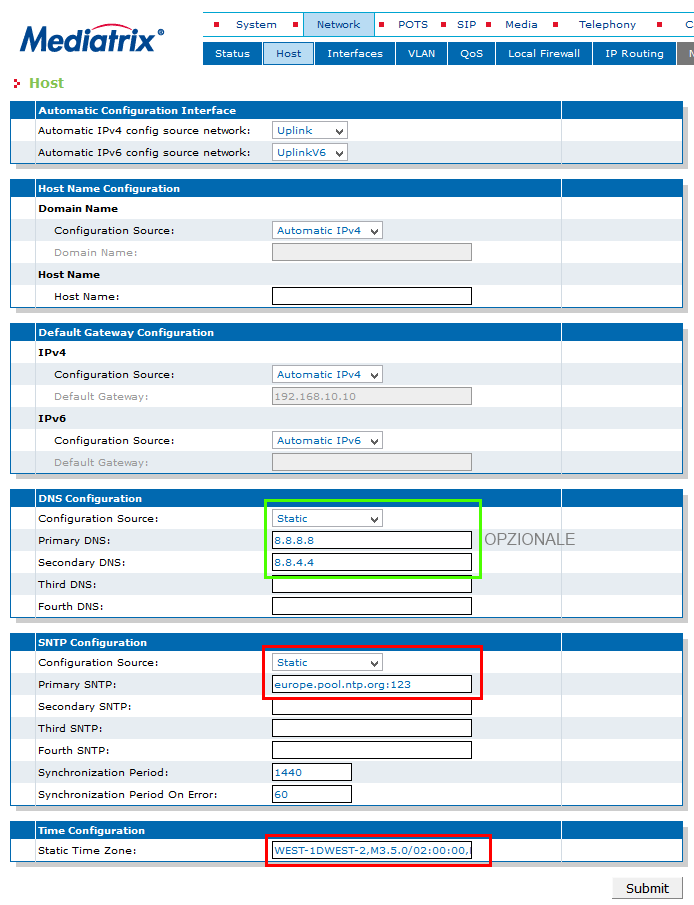
In this section, set the device network parameters and NTP servers for time synchronization. The latter is particularly important for the purposes of any consultations in the log files. To set a static Gateway and DNS IP address, set the Configuration Source fields to Static. Default Gateway Configuration and DNS Configuration (optional): if desired, enter the static IP addresses of the gateway and DNS on the Gateway and Primary / Secondary DNS fields. Server SNTP: enter the IP address or URL of an NTP server followed by port 123 (e.g. europe.pool.ntp.org:123 oit.europe.pool.ntp.org:123 or time.nist.org: 123). Time Zone: for Italy, set the value WEST-1DWEST-2, M3.5.0 / 02: 00: 00, M10.5.0 / 03: 00: 00 |
 |
| NOTE: If there is a DHCP server on the network that can dynamically assign IP addresses to terminals, this section can be skipped. | |
| Only if you need to assign a static IP address to the device follow these instructions, otherwise To assign or modify the static IP address to the device, enter the Network – Interfaces menu. In the Uplink line, make sure that eth1 is selected, IPv4 Static and set the ‘IP address in the Static IP Address field in IP / subnet format (slash notation) and the Static Default Router (ie the gateway of the device). network interfaces | 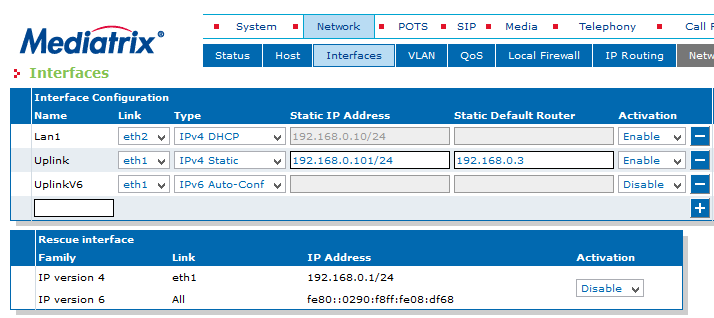 |
| NOTE: the ethernet port associated with the Uplink interface must be the only one connected to the switch, because the SIP packets will pass through it. Otherwise, the PBX will neither receive nor make calls. On devices with double ethernet ports, the eth2 port (called Lan1) can be set as desired (we suggest leaving it at the default value).
Rescue Interface: it is the eth1 emergency interface that is activated with the “partial reset” procedure on the fixed IP 192.168.0.1 (see first page of the pdf manual). It must be deactivated under normal conditions. |
|
FXS ANALOG PORT CONFIGURATION
| In the POTS – FXS Configuration menu, in the Country Configuration section, set the Override Country Configuration parameter to Enable and the Country Override Flash Hook Detection range parameter to 50-150. set the value above 50-250. POTS-Configuration | 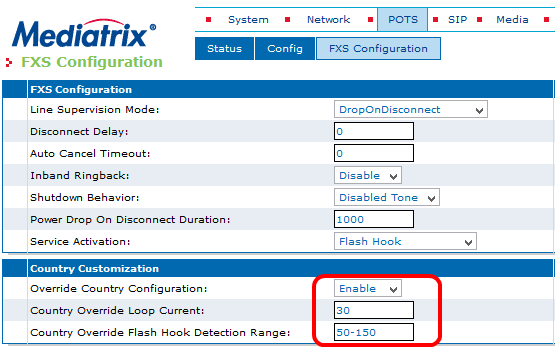 |
IMPORTANT: for the flash hook function to work correctly (pressing the R key to put the current call on hold) a configuration script must be loaded (see below Setting via external script)
Warning: a reset to the factory settings of the device will make it necessary to load this file again.
SIP GATEWAY CREATION
| In the SIP – Gateways section, configure the local SIP port of the gateway associated with the default LAN interface ETH1 (called uplink). The port is 5060 (SIP standard). If you leave the default value 0, the device will use the same port. Enterprise SIP Gateways | 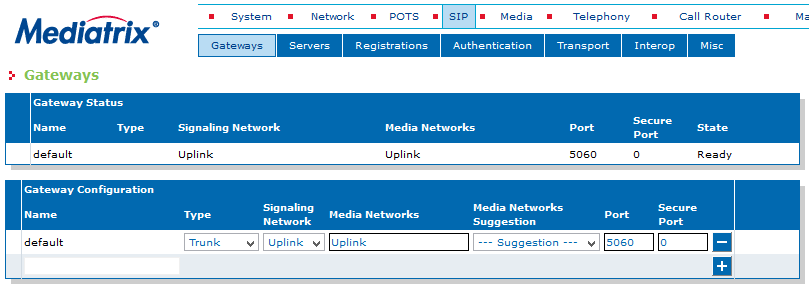 |
| If the ETH1 port is correctly connected to a switch and the device configurations have been performed correctly, the gateway status will be Ready | |
SETTING UP THE VOISPEED SERVER DATA
| In this section SIP – Device Servers configure the data relating to the VOIspeed Cloud server Register Host: domain name of the PBX in the format domain: port (e.g. mycompany.pbx: 5060) Enterprse SIP Servers | 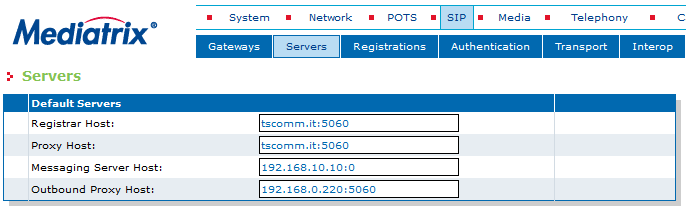 |
| Proxy Host: domain name of the PBX in the format domain: port (e.g. mycompany.pbx: 5060) Messaging Server Host: not used. Leave at the value of default Outbound Proxy Host: IP address of the PBX (e.g. 192.168.0.220:5060) |
|
INSERTION OF USER CREDENTIALS
| In this section, the FXS ports assigned to the users who will use the analog phones must be activated. Each port corresponds to an analog telephone Configure the Endpoints Registrations table to activate the individual FXS ports of the device: User Name: enter the numeric extension of the VOIspeed user Friendly name: user convenience name (eg. “Name surname”) Register: set to Enable Messaging: not used. Leave on Disable Gateway Name: leave on all |
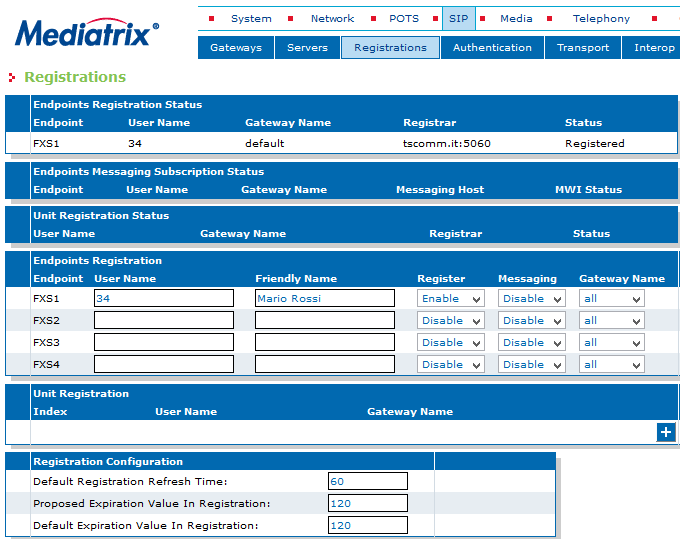 |
| In the Registration Configuration table, set the registration expiration value to the PBX. Default Registration Refresh Time: 10 Proposed Registration Refresh Time: 60 Default Expiration Value in Registration: 60 At the end of the settings, click on the Submit & Refresh button. If user registration was successful, after completing the insertion of the remaining credentials (see next section), in the Endpoint Registration Status table, you will see the registration status on Registered. |
|
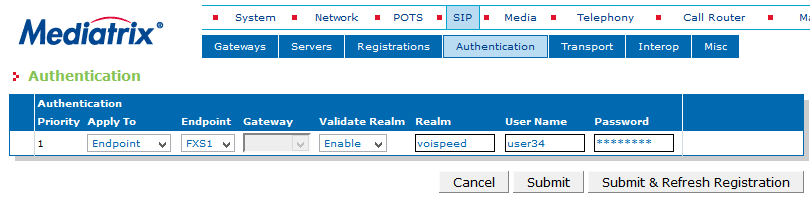
| In this section, the remaining credentials for FXS users must be configured For each FXS port the following must be configured: Apply to: set Endpoint; EndPoint: indicate the FXS port; Validate Realm: set to Enable. Realm: set voispeed; UserName: indicate the username of the user (it can be different from the internal one); Password: indicate the password of the VOIspeed CLOUD SIP Authentication user |
 |
CODEC SETTING
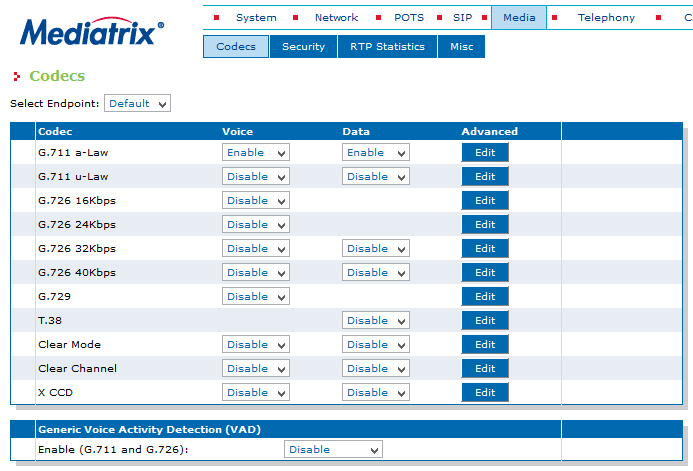
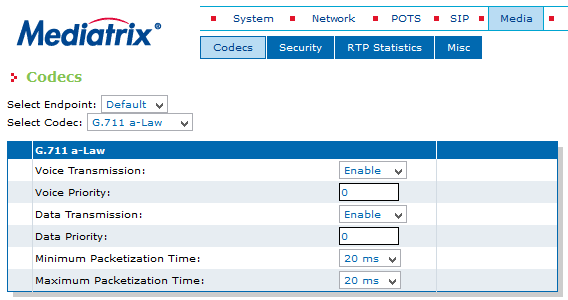
| Enable the G.711 a-Law codec and disable all the others (NOTE: in the case of using FAX machines, it is also possible to enable the T.38 protocol as long as the ISDN line adapter is a Mediatrix with the same active protocol).
Disable the VAD function at the bottom of the table. Click on the edit button corresponding to the G.711 codec and set the Min / Max packetization time parameters to 20ms.
|
 |
CONFIGURATION OF DTMF TONES AND NATIONAL SIGNALS
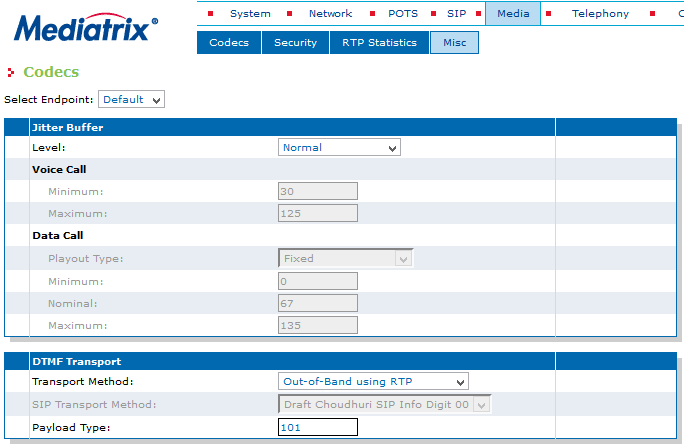
| In the Media – Misc section, set the device to use the RFC2833 standard for sending DTMF tones. Transport Method: Out-of-Band-using-RTP Payload Type: 101 In the Telephony – Misc section, set Country Selection to Italy1  |
 |
CONFIGURATION VIA EXTERNAL SCRIPT
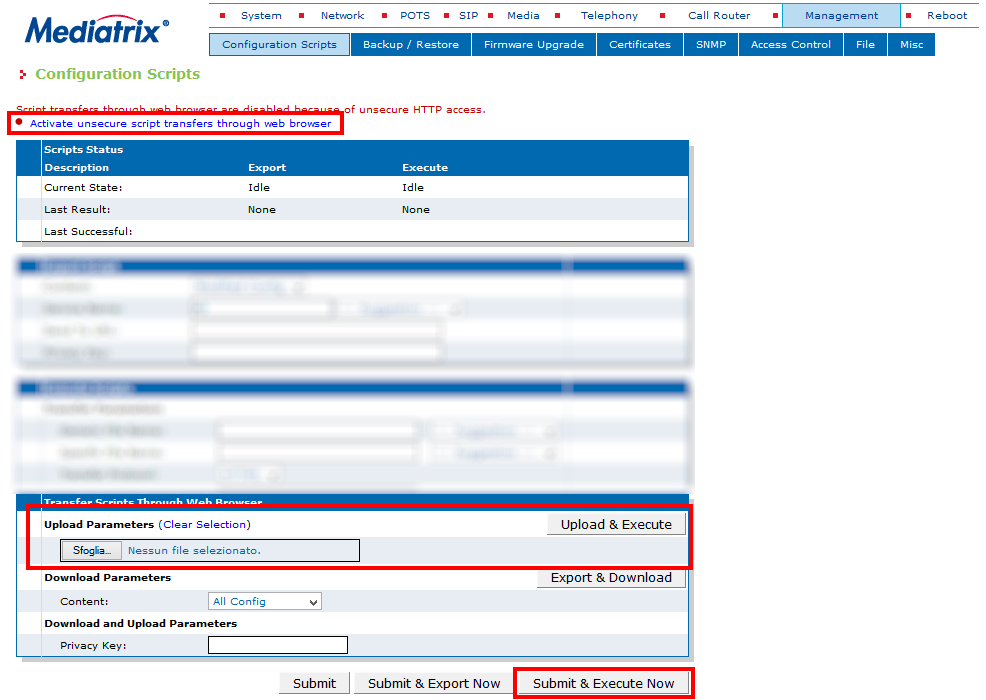
| On the Voispeed site there is a script (in text format) to be loaded into the device for the correct functioning of the putting on hold with the R key of the phones. Without this configuration, every time an analog phone puts a call on hold, the call itself will be disconnected. To upload the file, go to the section Management – Configuration Scripts
Click on the Activate unsecure script transfers through web browser link to activate the file transfer directly through the web page. Warning: a reset to the factory settings of the device will make it necessary to load this file again. |
 |
SYSTEM REBOOT
At each modification of the vital settings for the device, you are asked to restart the single service associated with the configured parameter. Although it is possible to do this, it is advisable to first perform all the configurations and then reboot all the services, by entering the System – Services section and clicking on the Restart Required Services button. If the parameter of a single service has changed, it is possible to restart only that one, by clicking on the button next to the indication Restart needed.
PARTICULAR CONFIGURATIONS ON THE PBX SIDE
In the settings of the terminal associated with the Mediatrix C7 (Menu Toolbox-Terminals), disable support for Standard Refer and Click to call.