
Manuali VOIspeed®
HOW TO INTERCONNECT TWO OR MORE REMOTE VOISPEED SWITCHBOARDS
A WAN route is a point-to-point connection between two VOIspeed switchboards, typically far from each other and which therefore requires the use of the respective xDSL connectivity (hence the acronym WAN: Wide Area Network). A WAN route allows switchboard users to call each other transparently as extensions of the switchboard itself, and to make phone calls with the telephone lines of the other office.
VOIspeed’s WAN routes use two protocols: the SIP protocol and the proprietary VOIspeed WAN protocol.
HOW TO CONFIGURE A WAN ROUTE WITH THE VOISPEED SWITCHBOARD
NOTE: the WAN route can only be configured on VOIspeed On-Premises switchboards.
PREREQUISITES:
– Open the ports and configure the NAT specific for the WAN Route.
– Shared users of two PBXs in a WAN route cannot have the same extension number.
From the Settings – Gateway menu, add a new gateway and set the parameters as follows:
| Type | WAN | 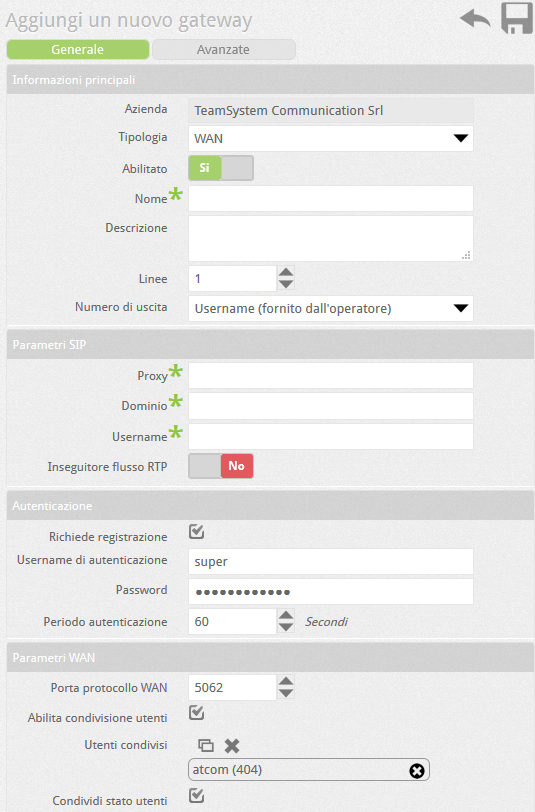 |
| Name | Convenient name (will be shown in call statistics) | |
| Lines | iindicates the maximum number of concurrent calls on the route. This is related to the quality of the connection with the remote switchboard. In fact, the calls travel using the audio protocols of the terminals (e.g. G.711, G.729, etc.), therefore the band occupied by each conversation will depend on their configuration 1 | |
| Exit number | set “Username (provided by the operator)” | |
| Proxy | IP address of the remote PBX (typically the public IP of the remote office). | |
| Domain | Domain of the remote PBX. NB: the domains of the remote servers must be different from the local one | |
| Username | Username of the WAN route (identical on both PBXs) | |
| RTP Flow Tracker | Not used on WAN Routes. Leave on No. | |
| Select Requires Registration and fill in subsequent authentication details | ||
| Username | Indicate the Username (identical on both PBXs, default voispeed) | |
| Password | Enter the Password (identical on both PBXs) | |
| Authentication Period | WAN route registration expiration period (default 60 sec). It is not recommended to use values higher than 120 | |
| WAN port | WAN protocol port of the remote server (default 5062) | |
| User sharing | Allows you to share all or some local users so that they can be “seen” by the remote server | |
| Shared users | Allows you to choose which users will be visible to the remote PBX via WAN | |
At the end of the configuration, save the settings with OK and repeat the same procedure symmetrically on the remote server.
NOTE: Users shared on a WAN route cannot have the same internal number.
NOTE: It is not possible to create WAN routes between companies in the same PBX with a multi-company license
USER SHARING OVER WAN ROUTES
In the Configuration – Users section, by clicking on the world32 button at the top, you can activate the user sharing window on the WAN routes of the PBX. This section summarizes in a convenient overview the status of the shares on all the WANs of the PBX and is obviously useful when the PBX manages more than one WAN route. This is what you see:
| In this window the users and the WAN routes are organized in a table. The WAN routes of the PBX are on the first row and the users on the first column. To share a user on a WAN route, locate the user (row) and the WAN route (column) and click on the empty cell given by the intersection of the two coordinates: a check mark will indicate the actual selection. Clicking on the header of a row or column will enable the corresponding user on all WAN routes, or all users on the corresponding WAN route, respectively. Any change in this area is obviously reflected in the list of shared users of the gateway WAN corresponding. |
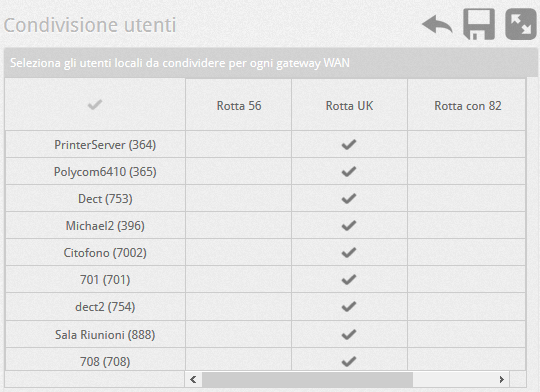 |
| Click on the first cell on the top left to enable all cells. To disable a cell just click inside the cell again to make the check mark disappear. |
|
Using the button you can view the users of the WAN routes shared by the respective remote PBXs and you can decide whether to make them available on the local PBX by selecting them or not.
| Click on the gray bar where the WAN route name appears to view the remote users, then select the users you want to show to local users. Press the button again to cycle back to the previous display. |
 |